Let's go!
Today’s the day: you are going to print your first “Hello world” With Kubernetes! Blogs, social networks, summits... You’ve heard of it just too many times, it is time to dive! Make yourself a nice cup of coffee, close your office door if you are lucky enough to have one, and let’s go for one hour of work: you will have launched your first Kubernetes stacks on the 3 majors Public Cloud providers.
This hand-on blogpost is composed of 6 steps, two of which are optionals if you already feel comfortable with Docker containers:
- Creating your Public Cloud accounts - if you haven’t got an account already, keep your credit card nearby!
- Installing your Command Line Interface (CLI), much simpler than consoles interfaces.
- (Optional) Creating a local Docker image that will print an HTML “Hello World” message
- (Optional): Uploading the images on the registries of the different Cloud Providers
- Creating a Kubernetes Cluster: once you’ve installed the CLI, we will launch our clusters with only a few commands.
- Launching the Kubernetes Stack.
As we say in french: en avant Guingamp!

Creating your Public Cloud accounts
The first step is not the most interesting one, and if you are lucky enough, you already have an account on Google Cloud Platform, AWS and Azure. If don’t, you will have to enter your credit card. Dont worry thought, we will make sure it will only cost you a few dimes.
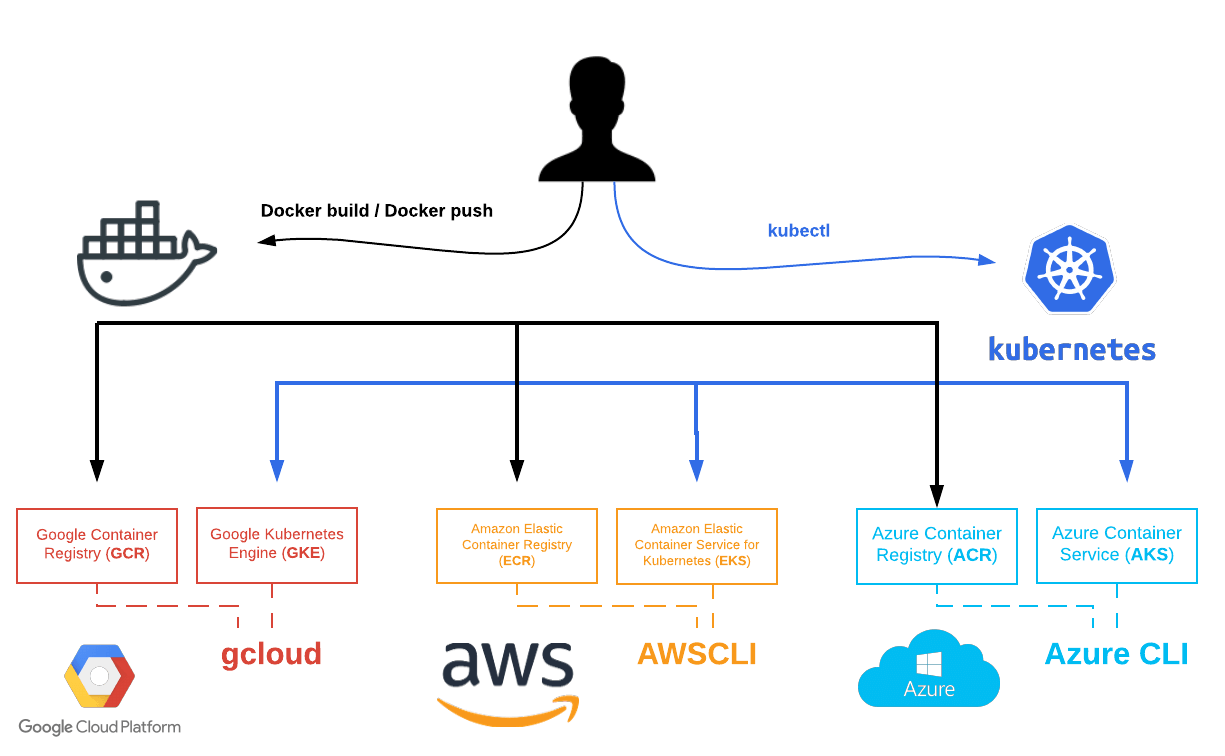
We are going to use the managed service that makes it easy for you to run Kubernetes:
- Google Cloud with Google Kubernetes Engine (GKE),
- Amazon Web Services with Amazon Elastic Container Service for Kubernetes (EKS),
- Microsoft with Azure Container Service (AKS)
Please not that Amazon EKS is still in preview. We will add the mention [preview] on the commands, as they may change.
If you need to create an account, here are the links to do so:
- Google cloud: cloud.google.com
- AWS: aws.amazon.com
- Microsoft Azure: azure.microsoft.com
Friendly reminder: if you do not follow this article until the end, please remember to stop any resources that you launch!
Once you are up and running on these three providers, let’s install the CLIs.
Installing the "Command Line Interface" (CLI)
Before launching our clusters, we need to install the different Cloud Providers CLIs. You should install them locally rather than on a distant machine.
Amazon Web Services: awscli
The AWS CLI installation is pretty simple via pip. Feel free to refer to the AWS official documentation in case of need.
# PIP installation
sudo apt-get install python-pip

# awscli installation
pip install awscli

# Or via the Ubuntu package
sudo apt-get install awscli
You can then configure the client, telling him the ACCESS_KEY and SECRET_KEY of your account.
# Client initialisation
aws configure

# [PREVIEW] You can now have a list of your EKS clusters
aws eks list-clusters
Google Cloud: gcloud
Like for AWS, the CLi can easily be installed, and you can refer to the official documentation.
# Repository configuration
export CLOUD_SDK_REPO="cloud-sdk-$(lsb_release -c -s)"
echo "deb http://packages.cloud.google.com/apt $CLOUD_SDK_REPO main" | sudo tee -a /etc/apt/sources.list.d/google-cloud-sdk.list

# Key import
curl https://packages.cloud.google.com/apt/doc/apt-key.gpg | sudo apt-key add -

# CLI installation
sudo apt-get update && sudo apt-get install google-cloud-sdk
Once the CLI installed, we can initialize the CLI.
# Client initialization
gcloud init
You will be asked to connect to an URL. Once logged, you can then create your new project: helloworld (lowcase only).
Note that you have to activate the project billing before being able to launch a Kubernetes cluster.
Microsoft Azure: Azure CLI
Once again, here is the official documentation.
# Repository configuration
echo "deb [arch=amd64] https://packages.microsoft.com/repos/azure-cli/ wheezy main" | \
     sudo tee /etc/apt/sources.list.d/azure-cli.list

# Key import
sudo apt-key adv --keyserver packages.microsoft.com --recv-keys 52E16F86FEE04B979B07E28DB02C46DF417A0893

# Dependencies installation
sudo apt-get install apt-transport-https

# CLI installation
sudo apt-get update && sudo apt-get install azure-cli
The command az --version should return your Azure client informations. To connect to your Azure account, use the command az login.
az login

To sign in, use a web browser to open the page https://aka.ms/devicelogin and enter the code DKK2***** to authenticate.
That’s it ! We can now create the Docker image which will be used by our Kubernetes clusters :)

Creation of a "HelloWorld" image
Installing Docker CE
This is one of the optional section if you already feel comfortable manipulating Docker.
On this section, we will work on a clientside, either on your laptop or any instance. We will be using Ubuntu 17.10.
First of all, we have to install Docker CE following the installation guide.
# System update
sudo apt-get update && sudo apt-get upgrade

# Dependencies installation
sudo apt-get install \
    apt-transport-https \
    ca-certificates \
    curl \
    software-properties-common

# Adding the GPG key
curl -fsSL https://download.docker.com/linux/ubuntu/gpg | sudo apt-key add -

# Adding the repository
sudo add-apt-repository \
   "deb [arch=amd64] https://download.docker.com/linux/ubuntu \
   $(lsb_release -cs) \
   stable"

# Installing the Docker CE package
sudo apt-get update && sudo apt-get install docker-ce
If everything went according to plan - I certainly hope it did ! - you should be able to execute the sudo docker ps command, listing all the launched containers on your instance. If not, you may be using a different OS than mine : once again, the Docker official documentation should help you find the answer.
$ sudo docker ps
CONTAINER ID        IMAGE               COMMAND             CREATED             STATUS              PORTS               NAMES
Image building
We are going to build our image based on the official documentation.
We are going to use three files:
- A Dockerfile, it describes the way our image must be built,
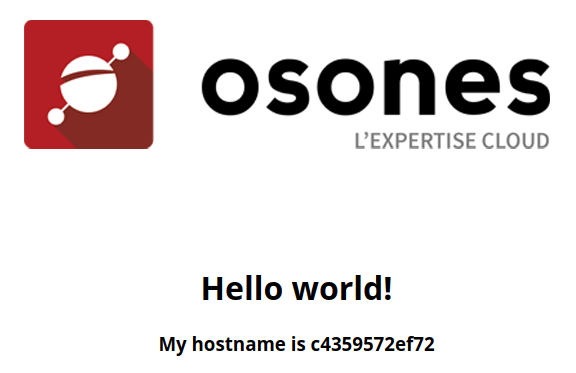
- An index.php document, our php page which display Hello World.
- Our magnificent Osones logo to add some color to the page.
Put those files into a directory on your system:
mkdir helloworld && cd helloworld
wget https://raw.githubusercontent.com/Osones/docker-images/master/helloworld/Dockerfile
wget https://raw.githubusercontent.com/Osones/docker-images/master/helloworld/index.php
wget https://raw.githubusercontent.com/Osones/docker-images/master/helloworld/logo_osones.png
We are now ready to locally build our image !
sudo docker build -t helloworld .
After a few seconds, we can list our images and see it is ready to launch.
sudo docker images
REPOSITORY                TAG                 IMAGE ID            CREATED             SIZE
helloworld                latest              1a690a7cbe56        7 seconds ago       30.9MB
You can run it locally to check everything is OK:
sudo docker run -it -p 80:80 helloworld
The “Hello World” message should now be visible in your browser when you connect on the 80 port.
Perfect, we can kill our container with a
Ctrl+c in the console and go to the next section ! Yeeeaahhh !

(Optional) Uploading our image on the registries
As we said before, we are going to use the managed services for Kubernetes on the different Cloud Providers. We could have used a Kubernetes stack with image pulled from a public registry like Docker Hub, but what’s the fun in that!
Google Container Registry (GCR)
If you do not have a default project on your GCP account, you will have to create one called osoneskub.
# Create a project
gcloud projects create osoneskub

# Specify the project and the zone we work in
gcloud config set project osoneskub
gcloud config set compute/zone europe-west1-b
We need to tag our helloworld image before uplading it into GCR. The syntax have to be the following:
docker tag [SOURCE_IMAGE] [HOSTNAME]/[PROJECT-ID]/[IMAGE][:TAG]
- Source image: helloworld
- Hostname: eu.gcr.io if you want to be in Europe
- Project-id: you can find this info using gcloud projects list. It is, on our example, osoneskub.
- Image: the name of the image on GCR. We will keep “helloworld”
Replace “osoneskub” with your own !
sudo docker tag helloworld eu.gcr.io/osoneskub/helloworld
Push the image.
sudo gcloud docker -- push eu.gcr.io/osoneskub/helloworld
Check it’s correctly uploaded
gcloud container images list-tags eu.gcr.io/osoneskub/helloworld
Our image is in the Google’s registry, let’s do it again with Amazon this time.
Amazon Elastic Container Registry (ECR)
Let’s check the CLI is properly configured:
aws ecr describe-repositories
{
    "repositories": []
}
We can see, we do not own any registry. We’re gonna create one: helloworld
aws ecr create-repository --repository-name helloworld
It will output the registryId we will use in the next command. Then we will tag, log into the registry and then push our image.
Replace with your own registry in the next commands
# Tag the image
sudo docker tag helloworld 355865212965.dkr.ecr.eu-west-1.amazonaws.com/helloworld

# Get ECR Docker credentials
eval $(aws ecr get-login --no-include-email)

# Push the image
sudo docker push 355865212965.dkr.ecr.eu-west-1.amazonaws.com/helloworld
That's it ! Your image is stored in ECR, let's move on to the Azure one.
Azure Container Registry (ACR)
Azure does not supply a default project, you will need to create one: let's call it osoneskub
az group create --name osoneskub --location westeurope
Next, we can create a registry on ACR. Be careful to use your resource group if you already have one. Create your own registry:
az acr create --resource-group osoneskub --name helloworldosones --sku Standard
Once created, we need to tag and push just like on AWS or GCP.
# Tag the image
sudo docker tag helloworld helloworldosones.azurecr.io/helloworld

# Get Docker credentials
sudo az acr login --name helloworldosones

# Push the image
sudo docker push helloworldosones.azurecr.io/helloworld
Bravo ! CLIs are installed and images pushed, on all 3 Cloud providers. 3 2 1, let's launch Kubernetes clusters

Create Kubernetes clusters
In this part, commands will differ according to each Cloud provider. Once the clusters deployed, we will use Kubernetes unified CLI: kubectl to talk to the Kubernetes API and drive our deployments in a consistent fashion, abstracting the Cloud provider.
You can install kubectl either by just downloading the binary or with your package manager. If you need any help, refer to the official documentation.
# Kubectl installation on Ubuntu
sudo apt-get install kubectl
We will use osoneskub as cluster name on the 3 Cloud providers, we can use your own naming convention of course. We assume you followed the previous steps.
Google Kubernetes Engine (GKE)
To create our first GKE cluster:
gcloud container clusters create osoneskub
After a few minute, we can check the deployment state:
gcloud container clusters list
NAME       LOCATION        MASTER_VERSION  MASTER_IP       MACHINE_TYPE   NODE_VERSION  NUM_NODES  STATUS
osoneskub  europe-west1-b  1.8.7-gke.1     35.205.144.187  n1-standard-1  1.8.7-gke.1   3          RUNNING
It is also visible on the console.

That's all for now !
One the GCP side, you have a ready cluster with 3 nodes, each one with 3 vCPU and 15Go RAM.
[PREVIEW] Amazon Elastic Container Service for Kubernetes (EKS)
The following commands are only accessible if you managed to get an access to the preview. We will update the article when the service reaches GA.
First we need to deploy a CloudFormation stack with a VPC and a role. Once this is done, you can deploy a Kubernetes cluster.
# Cluster EKS
aws eks create-cluster --cluster-name osoneskub --vpc-id <vpc-[...]> --role-arn <arn:aws:iam::[...]>

# Endpoint
aws eks describe-cluster --cluster-name osoneskub --query cluster.masterEndpoint
After that you get the Kubernetes control plan: the API, but no worker yet.
Worker deployment is done with another CloudFormation stack where you specified the number of worker you want, in which subnet, etc.
That's all for EKS !
Azure Container Service (AKS)
Finally, let's launch a cluster on Azure
Same as Google, we assume that you follow this article up until the resource group and registry creation or that you already have an Azure resource group you can use. In this example our resource group is osoneskub
# Kubernetes cluster
az aks create --resource-group osoneskub --name osoneskub --generate-ssh-keys --node-count 2
we're almost there !
Just like GKE, we will get a ready to use cluster.

Launching an app on Kubernetes
Configure Kubectl
The first step is to configure kubectl to talk to your cluster. Depending on the Cloud provider, the commands are:
- GKE:
gcloud container clusters get-credentials osoneskub - AKS:
az acs kubernetes get-credentials --resource-group osoneskub --name osoneskub - EKS: The task is a little bit more complicated on AWS, you need to download a YAML and edit it manually. Let's hope it will be fully automated for GA.
To check that everything is ok:
kubectl get nodes
Should return a list of instances part of your cluster.
You are now ready to launch your first app ;). The template will be identical for the 3 Cloud provider, except maybe the image name because of the different registries.
This template is a simple web service exposed with a load balancer of port 80.
Download the template, change the image used with your own registry URL and launch the template:
# Download template
wget https://blog.osones.com/images/kubernetes101/template.yml

# Change your image
vim template.yml

# Launch the stack.
kubectl create -f template.yml
You should see the following resources - described in the template - being created:
deployment "helloworlddeployment" created
service "helloworldservice" created
If you followed everything correctly, you should be able to access your service on the public IP of the load balancer. To get the public IP, just the list the services:
kubectl get services
NAME                TYPE           CLUSTER-IP      EXTERNAL-IP     PORT(S)        AGE
helloworldservice   LoadBalancer   10.23.249.131   35.195.136.97   80:32750/TCP   1m
You should be able to connect to your service on the external-ip. When you refresh the page you can see the hostname change. If not just try with curl so there is no caching mecanism or session involved.
It's as simple as that ! The majority of this article is about setting up clusters, but once you get your control plan up and running and add some nodes, Kubernetes API is unified for all Cloud provider, that is the real power here, same API, same tooling on every major Cloud ! Awesome right?

Cleaning up
Congrats, you just launched your first cluster(s), but you have got to pay for it at some point. If you don't want too, just delete everything:
Google Cloud
# Delete project, everything inside will be deleted
gcloud projects delete osoneskub
Amazon Web Services
On AWS you need to delete the registry and the cluster.
# Delete the registry
aws ecr batch-delete-image --repository-name helloworld --image-ids imageTag=latest
aws ecr delete-repository --repository-name helloworld
# Delete the cluster
aws eks delete-cluster --cluster-name osoneskub
Microsoft Azure
# Delete the resource group, everything inside will be deleted
az group delete --name osoneskub
Conclusion
Kubernetes will not help you to explain what your job is but at least when your boss asks "Who has already tested Kubernetes?**, he can:

and then:

And your coworker:

Stay tune for another Kubernetes 101 and creating your own template from scratch!
Découvrez les derniers articles d'alter way
